

Know that feeling - been there and done that a few times. Including over tightining a bolt and snapping it off in place
Waiex Project
Moderator: Tailspin
Re: Waiex Project
Don't worry 
Know that feeling - been there and done that a few times. Including over tightining a bolt and snapping it off in place gotto drill it out and put in a new one - and read your torque wrench and make sure you have it set right and not like me put in 80Ft/Lbs instead of 8
Know that feeling - been there and done that a few times. Including over tightining a bolt and snapping it off in place
Gavin van der Berg - ZS-WWF
“The genius controls the chaos”
One of the Proud Chain Gang Founding Members
“The genius controls the chaos”
One of the Proud Chain Gang Founding Members
Re: Waiex Project
OK, going well again!
Canopy basically done, just need to drill and tap larger holes for the bows, and finish the latch. Have fitted the tail wheel fairing - looks tiny! Painted the glareshield.
Fit a few fairings, move the plane to the airfield ths weekend, fit wings, then rigging etc, so getting closer all the time.
Below some pics.
- Attachments
-
- IMGP1364.JPG (64.84 KiB) Viewed 3081 times
-
- IMGP1363.JPG (49.83 KiB) Viewed 3083 times
-
- IMGP1362.JPG (54.07 KiB) Viewed 3082 times
Still Flying
Re: Waiex Project
More
- Attachments
-
- IMGP1369.JPG (44.77 KiB) Viewed 3070 times
-
- IMGP1368.JPG (46.87 KiB) Viewed 3073 times
-
- IMGP1366.JPG (62.62 KiB) Viewed 3069 times
Still Flying
Re: Waiex Project
Last for now!
- Attachments
-
- IMGP1376.JPG (44.25 KiB) Viewed 3060 times
-
- IMGP1375.JPG (56.56 KiB) Viewed 3060 times
-
- IMGP1374.JPG (50.22 KiB) Viewed 3064 times
Still Flying
-
RV4ker (RIP)

- The Big Four K

- Posts: 5386
- Joined: Sun May 22, 2005 7:48 pm
- Location: The Coves & FAVB
Re: Waiex Project
Drooool. Looks awesome...
he he he
Canopies are a bitch. i know a couple of the RV guys had same problems...
he he he
Canopies are a bitch. i know a couple of the RV guys had same problems...
4 Sale (will trade)
P166S, Jodel, hangar and other odds and sods
Radial - http://tiny.cc/eppqp
Still @ The Coves (Harties) but dream has died
P166S, Jodel, hangar and other odds and sods
Radial - http://tiny.cc/eppqp
Still @ The Coves (Harties) but dream has died
-
RudiGreyling
- Top Gun

- Posts: 695
- Joined: Fri Jun 03, 2005 9:10 am
- Location: The Coves
- Contact:
Re: Waiex Project
Hi Larry,
Wow looks really nice! Sorry about your first canopy cracking
Ja the Canopy, cracking, sorry saw this late, but I decided to glue my RV canopy with Sikaflex. Sika much stronger that rivets or screws, did the comparitive test myself. Chances of cracking very small, cause you don't drill holes, and don't attach with fastners. The expanding ratio between fastners, metal and plexi very different, hence over time cracks can develop, ask the RV guys they know all about it. Some people drill slightly oversized holes to compensate for difference in expansion.
If I do it again I will sika glue it again.
PS: Some tips I picked up on the web, use a high speed grinder to cut canopy. Before you put any bending force on canopy ensure you smooth and polish the edges, file smooth, scotchbrite edge, and polish with a old rag. The edge needs to be as smooth as a babies bum, any nick or scratch on that edge when you bend it will crack over time. It is much worse than aluminium so take extra care in your preperation. You get special plexi drill with the drill's penetrating angle just right for plexi. If you don't have special plexi drills, blunt your drill first by drill into a brick. A sharp metal drill and plexi canopy not ideal. If you need more info phone me 083-245-9955, but I guess by the time you read this you will be done with your canopy.
"Science, freedom, beauty, adventure - Aviation offers it all"
http://www.RudiGreyling.com
http://www.RudiGreyling.com
-
Old, Fat and Hairy
- Passed radio course

- Posts: 71
- Joined: Tue Jul 22, 2008 8:05 pm
Re: Waiex Project
Checked out the Sikaflex website and see they have a variety of products. Which one did you use? Also, can it be used on the canopy bows too and are there any rivets/screws/bolts necessary in the construction?
Only got one canopy so only one shot at this.
Only got one canopy so only one shot at this.

-
RudiGreyling
- Top Gun
- Posts: 695
- Joined: Fri Jun 03, 2005 9:10 am
- Location: The Coves
- Contact:
Re: Waiex Project
Ditto Morph,
Sikaflex 295UV, make sure you get the Cleaner and the Primer as WELL!
Yes you can use it on the (bow) curves. you can sand and paint over it.
The cleaner just cleans, but the primer changes the molocular structure of the plexi for better adhesion. Or that is the way it has been explained to me...
Do a search and download the PDF on it. then adhere to the minimum and max thicknesses to it.
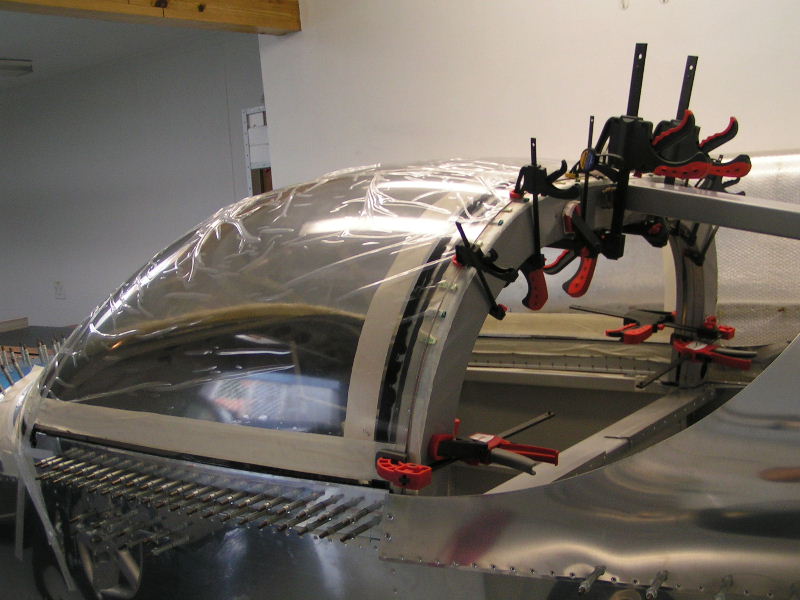
My RV canopy did not have 1 screw or rivet in it, but it did have exactly 4 holes and cleckos in to hold it into place, while it dries. Many clamps.
Go to my website there are many pictures but here is one..http://www.rudigreyling.com/pictures/rv ... opy_00.jpg
Just do a websearch on Sikaflex and Canopy and RV you will get many hits.
Or visit the http://www.RVclubSA.com website, under the technical area, there is a long write-up by the originator Chalkie, but he used the non UV product many years ago. the 295 UV is better.
Regards
Rudi
Sikaflex 295UV, make sure you get the Cleaner and the Primer as WELL!
Yes you can use it on the (bow) curves. you can sand and paint over it.
The cleaner just cleans, but the primer changes the molocular structure of the plexi for better adhesion. Or that is the way it has been explained to me...
Do a search and download the PDF on it. then adhere to the minimum and max thicknesses to it.
My RV canopy did not have 1 screw or rivet in it, but it did have exactly 4 holes and cleckos in to hold it into place, while it dries. Many clamps.
Go to my website there are many pictures but here is one..http://www.rudigreyling.com/pictures/rv ... opy_00.jpg
Just do a websearch on Sikaflex and Canopy and RV you will get many hits.
Or visit the http://www.RVclubSA.com website, under the technical area, there is a long write-up by the originator Chalkie, but he used the non UV product many years ago. the 295 UV is better.
Regards
Rudi
"Science, freedom, beauty, adventure - Aviation offers it all"
http://www.RudiGreyling.com
http://www.RudiGreyling.com
-
Old, Fat and Hairy
- Passed radio course
- Posts: 71
- Joined: Tue Jul 22, 2008 8:05 pm
Re: Waiex Project
Thanks for the gen. So it'll stick the plexi to the metal canopy bow without problems? Being chicken, I may add a rivet low down near the coaming on each side to prevent any surprises should it say "Howzit!" in flight.

Re: Waiex Project
Rudi will the stuff work on the Sonex's canopy frame structure ? As far as I can remember the canopy frame is a thin tubular structure made from approx 1/2" Al tubing. Will this give sufficient bond area? 
Larry why did you change your name - not a political name change I hope ! (or is it one of your fellow artisans posting as well?
  )
)
Larry why did you change your name - not a political name change I hope !
Re: Waiex Project
Hi Guys
Andycap - not sure about the name change, or where you refering to?? Still always post under my details?? Im not oldfatorhairy?
Very interesting info about the canopy, and fixing. I know of a few guys who have needed - and a few more who will need this info!
Unfortunately to late for me, BUUTT my second one is in and done!!!! Latch in and working, closes ok, about 95% happy with the end product, which I have to accept, being first time etc!
Final fairings etc going in. Now opened the cowls again, and fitting things which Jab Fact neglected to do. Choke cable, 2 more cht's, 4 egt's. Need to connect seat belts. Moving to the hanger this weekend, fitting wings, rigging controls etc, I can feel a flight coming on.
Had long talks to caa today, am going to try to get exemption from stress testing, and go straight to flight testing. Can be difficult, but do-able. Also got a copy of a Swiss certification, and trying to get the UK one. Applying for registration now, and sending in motivation letters for exemption etc. Hold thumbs!!
Andycap - not sure about the name change, or where you refering to?? Still always post under my details??
Very interesting info about the canopy, and fixing. I know of a few guys who have needed - and a few more who will need this info!
Unfortunately to late for me, BUUTT my second one is in and done!!!!
Final fairings etc going in. Now opened the cowls again, and fitting things which Jab Fact neglected to do. Choke cable, 2 more cht's, 4 egt's. Need to connect seat belts. Moving to the hanger this weekend, fitting wings, rigging controls etc, I can feel a flight coming on.
Had long talks to caa today, am going to try to get exemption from stress testing, and go straight to flight testing. Can be difficult, but do-able. Also got a copy of a Swiss certification, and trying to get the UK one. Applying for registration now, and sending in motivation letters for exemption etc. Hold thumbs!!
Still Flying
Re: Waiex Project
Case of mistaken ID then
For a moment I thought OF&H was commenting on your project
Sounds Good! Good luck with the 'Peppa wek'
You planning to testfly her naked with only a red nose?
For a moment I thought OF&H was commenting on your project
Sounds Good! Good luck with the 'Peppa wek'
You planning to testfly her naked with only a red nose?

Re: Waiex Project
Hi Larry,
I bet you are getting excited.
Just as a matter of interest, how did the fuel tank repair work out?
Hope you have your ATF real soon.
Kind regards,
Gunter Rostek.
I bet you are getting excited.
Just as a matter of interest, how did the fuel tank repair work out?
Hope you have your ATF real soon.
Kind regards,
Gunter Rostek.
-
RudiGreyling
- Top Gun
- Posts: 695
- Joined: Fri Jun 03, 2005 9:10 am
- Location: The Coves
- Contact:
Re: Waiex Project
Andy and others,AndyCAP wrote:Rudi will the stuff work on the Sonex's canopy frame structure ? As far as I can remember the canopy frame is a thin tubular structure made from approx 1/2" Al tubing. Will this give sufficient bond area?
On my RV canopy I had 1/2" all round, some places less.
Download and read the sikalfex 295 UV PDF's.
Get the sikalflex, cleaner and primer. Follow the PDF exactly, pay particular attention to preparation and the thickness required for maximum strength.
Make Test samples of your cut off canopy, exactly the same dimensions as per plane, one with normal fastener spacing, one with sikaflex glue join.
Let it cure and then break both test samples, you be the judge, and show it to your AP! I am not going to tell you it is going to work, you be the judge.
You will be pleasantly surprised!
on mine, I used spacers of hose pipe +/- 5mm thick every 3-5" to keep glue joint gap consistant between plexi and frame, for most of the glue joint. Some places where I needed a thight fit, I just squeesed the sika in to get best bond, and it went down to almost zero joint, for looks. But try to get most of the glue joint consistant gap.
I did it in 2 stages:
1) Initial glue with spacers in and let it cure, with clamps and holding clekos in place.
2) then remove spacers and clamps and run a smooth bead of silicon along the enitre canopy inside and out to fill spacer gaps and finish it off. Do small runs at a time 50cm or so. Finish it off with a wet soapy finger to get a smooth fillet.
Phone me if you want more info: 083-245-9955 but google the web, there is some good literature, but at least follow the principles I laid out for you.
Regards
Rudi
"Science, freedom, beauty, adventure - Aviation offers it all"
http://www.RudiGreyling.com
http://www.RudiGreyling.com
Who is online
Users browsing this forum: No registered users and 13 guests