

Stefan if I take the turtle deck of and the flaperons she folds well , but you are right bolt and nut will do the trick. When you wait for paperwork then you do funny things like that , the other Bushbaby owners can use it
Cheers Oupa-G
Building the new Bushbaby SAFARI
Moderator: Tailspin
Re: Building the new Bushbaby SAFARI
CAA are still confused about the wing on ZU-OTT I took some photo's of the dimensions and thought it may be interesting . The wing lift struts wall thickness was increased to 1.2mm and the wing attach point is 330 mm further out . It is 2500mm in the Safari wing and 2170mm in the Explorer wing. And then of course the cabin is wider and longer and Higher. Just some tit-bits of info. Obviously the lift struts are also longer.
Cheers from past midnight Oupa-G
Cheers from past midnight Oupa-G
- Attachments
-
- 2500mm for Safari wing
- ZU-OTT Wing3.jpg (41.63 KiB) Viewed 4592 times
-
- 2170 for Explorer wing
- Explorer Wing2.jpg (41.84 KiB) Viewed 4592 times
-
- 2750mm For Safari wing lift strut
- ZU-OTT Wing6.jpg (44.24 KiB) Viewed 4592 times
-
- 2452 For Explorer wing lift strut
- Explorer Wing4.jpg (41.09 KiB) Viewed 4592 times
-
Dusty Eagle
- Solo cross country

- Posts: 127
- Joined: Wed Aug 31, 2005 7:57 am
- Location: alewynspoort
Re: Building the new Bushbaby SAFARI
Hi OupaG.
I see that OTT has smaller than standard registration lettering.
How did you get this right?
Regards.
Nico
I see that OTT has smaller than standard registration lettering.
How did you get this right?
Regards.
Nico
nico
Re: Building the new Bushbaby SAFARI
I measured the available white space on the wing and had lettering made to fit the area.
It is readable from 500ft.
So that is the story
I flew a lot of RedX this weekend Friday night to Kimberley 80kt head wind and tailwinds Icing between fl160 and 260 If you fly high the head winds eat you and you pick up ice and lower down the headwinds were only 60kts but you chew more fuel. So back at night the only answer was put in more fuel. It is interesting to be in these severe elements. You ask yourself what am I doing inside a aluminium tube at night immersed in cloud with a controlled fire inside a well designed furnace. Luckily the PT6 keeps on spinning. I had a days rest which most of it I slept and then today I did an easy flight all clear sky's to Vredendal and back. I'm busy making new exhausts this time with a round silencer and slip joints. The pieces are falling into place and all my measuring is completed. I had hoped to finish it this weekend but the week evening now have direction. I'm tired and I'm getting into bed with a brand new Kitplanes magazine.
Cheers Oupa-G
Re: Building the new Bushbaby SAFARI
The CAA is trying to drain my energy but they have lost I have made myself mentally free from them. Only flying can bring out unforeseen problems in a design , and once the problem is identified it is easy with hindsight to say "yes you dumb ass" it is obvious.
We had cracking in the beautiful exhausts the flat surfaces oil canned and cracked nothing serious but should not happen so I removed my exhaust from OTT and replaced it with a spare exhaust I had made. I also found that the flexible pipe that I used , the inside webbing came loose and the inside of the pipe was like having a pot scraper inside. I had used one imported pipe and the other side was locally produced. Unluckily it was the locally produced one that gave the problem so this is a case of local is not so "lekker".
The redesign is based on slip joint which we have used with success on other installations. The exhaust of my Baron is full of slip joints. The stretching of the pipes I do myself with a specially made mandrel in my lathe it is slightly tapered to facilitate removal.
Each joint is held in place with springs. The whole exhaust is constructed in a jig for tension free free fit. Flying is the only way to test the exhaust. I'm showing the tacking of the exhaust done by Gerrie the expert welder. We have had a lot of discussion of welds but the uncontaminated weld has the the highest strength and the least chance of cracking. Every parts is marked so it can only go together in one way. This exhaust is for the Banana Boy aerie which is an Explorer. I have more tomorrow on the versatile MGL instrument. Enjoy tonight photo,s . I can also report that the new flywheel fitting and adapter plate in steel that replaced the aluminium fitting has made the engine ultra smooth. There must have been some sort of flexing that lead to the failure I had on my Trike. The 1100 motor on my trike is going to be replaced by a 1200GS engine. Ystervark is helping me making the engine mount. He has analyzed all the stresses and has redesigned the mount made it lighter and stronger that is the finesse of good engineer.
Enjoy the Photies the last photo shows a different length of the inter connecting pipe that is due to the cylinder offset.
Cheers Oupa-G
- Attachments
-
- Flextube failure
- New Exh 1.jpg (43.85 KiB) Viewed 4358 times
-
- Potscraper inside
- New Exh 2.jpg (50.18 KiB) Viewed 4358 times
-
- All pipes stretched and fitted
- New Exh 3.jpg (47.59 KiB) Viewed 4358 times
-
- Pipe in the press with home made mandrel
- New Exh 4.jpg (57.83 KiB) Viewed 4358 times
-
- Gerrie the expert at it
- New Exh 5.jpg (53.65 KiB) Viewed 4358 times
-
- everything tacked
- New Exh 6.jpg (45.3 KiB) Viewed 4358 times
-
- all parts marked
- New Exh 7.jpg (38.85 KiB) Viewed 4358 times
-
- Tacked parts dismantled for final welding. One can now see the many parts that can move independently
- New Exh 8.jpg (44.5 KiB) Viewed 4358 times

Re: Building the new Bushbaby SAFARI
Just trying
Oupa-G
Oupa-G
Re: Building the new Bushbaby SAFARI
Picked up the final parts of the exhaust Gerrie excelled himself again, I love his attention to detail and the love he gives to the projects we make.
Everything fits and I had him mark all the parts so that many years down the line one can still assemble the pipes in the correct order.
I'm showing some weld details first the exhaust back in the jig and then all the parts apart. There is a nice lot of movement between the parts and will prevent cracking it now needs flying hours.
Enjoy the photies
Cheers Oupa-G
- Attachments
-
- Finished exhaust back in jig for final check
- New Exh 9.jpg (47.6 KiB) Viewed 4272 times
-
- Some weld detail and the coding of joints note also the collett to accommodate difference in pipe diameter
- New Exh 10.jpg (41.25 KiB) Viewed 4272 times
-
- All the parts separate
- New Exh 11.jpg (43 KiB) Viewed 4271 times
-
- comparison of welds from the factory and our welds the viewer is the judge
- New Exh 12.jpg (32.36 KiB) Viewed 4271 times

Re: Building the new Bushbaby SAFARI
Mmmm. Hy het al.Hy kan maar weer!! 
Re: Building the new Bushbaby SAFARI
I also promised some detail on the MGL instrument and it's versatility. With the help of Juergen from JJ Avionics ( just Google it )
Juergen is a boffin on designing screens for the MGL and instead of sitting all evening I make exhausts and Juergen Designs your request.
I have installed a video camera for taxiing and also loaded App plates from Juergens website You get the new screen files also at speed of light or as fast as what the internet is.
Just a view of the blind spot that you cannot see you have to weave to be able to see. Also an example of one of the app plates you can load the whole set on the SD card.
Looking today the amount of visitors have now passed 160,000 hard to believe.
Thats all
Cheers Oupa-G
- Attachments
-
- the view in front of my hangar
- MGL 1.jpg (34.72 KiB) Viewed 4261 times
-
- ILS 01 Cape Town
- MGL 2.jpg (41.67 KiB) Viewed 4261 times
Re: Building the new Bushbaby SAFARI
As I am looking back at my experiences with my BMW engines and in keeping with the philosophy of this Webb page to not only report positive things but also the negative things that have happened in the last 9 years that I have been operating these engines. In SA I have most probably the most engine hrs on BMW's. Everything that has happened to the engine or gearbox I have also reported to the producer of the Gearbox and quite a few recommendations have been incorporated in the later gearboxes that were delivered. I have regular contact with Wilfried and we exchange Ideas.
Here are some problems I had.
To start of we have had no problems with the EboXi and they all have performed flawlessly Some boxes were returned to check but all irregularities were always wiring or installation faults.
On my first gearbox on the 1100 engine I had the following.
Disintegration of the doughnut rubber , I replaced it with the rubber from BMW drive shaft passed the information on to Take-Off and it was subsequently incorporated in later gearboxes.
I think we operate at higher temps.
The friction linings came undone on one of my clutches . I replaced the clutch.
On a subsequent clutch the stops on the clutch were not properly welded and came loose with a grinding noise again the one piece clutch was replaced.
I replaced the old gearbox with a brand new gearbox that has the longer gear casing giving me more clearance of my prop with the rear part of the wing.
This gearbox did 30 hrs when the aluminium adapter plate between engine and the one piece clutch failed jamming the gears and breaking the whole gearbox housing in two. The prop and half of the gearbox fell off. Finished was my brand new gearbox.
The adapter plate was analised there were 90 degree angles in the machining without radius's . It was again reported to Take-Off . They have never had a similar failure. The specific adapter plate had 400hrs on it .
The redesign was shared with the factory.
On the Bosvark I had a failure of the flywheel itself due to the four bolts that hold the one piece clutch to the adapter plate.
The problem was diagnosed and corrected. Take-Off was informed. Everybody that is operating a BMW engine in SA were informed of all the problems I have had.
In keeping with the honesty on this page I have reported all the problems for the sake of safety. I have no interest to put any product in a poor light.
It is only with sharing this information that we can eventually have a safer aviation engine.
On my Bosvark all the changes have been incorporated. We have seriously looked at vibration levels and it is true that the power pulses of a two cylinder engine are much harsher then in a 4 cyl engine and the 6cyl horizontally is in natural balance. Luckily Ystervark is giving me a lot of help regarding the various harmonics that can take place. The whole harmonics is a black art . On some Mooneys there are certain revs that are not allowed. The PC12 also has certain restricted prop speeds. So also the big boys are having unresolved harmonics.
The Bosvark with its latest mods based on our previous experience is now ultra smooth, but only time will tell with lots of hrs. There is no better test bench then flying the machines. CAA is doing there utmost to keep me out of the sky but I'm not listening anymore. They must get there act together. I hope they read this.
In my next writing I will delve deeper into the inherent fine internal balancing of the 1200 motor.
After the Namibia episode the trike is getting a new engine this time it will be a 1200GS with all of the mods.
And maybe some more surprises. Ystervark is helping me with a new engine mount. He took my old mount redesigned it did some serious computer loading and came up with a lighter and stronger engine mount.
Nothing beats good engineering.
CAA tried to break my speed but they have not succeeded. We are back on a roll and hope to contribute to the fraternity of "Aviation Enthusiasts"
Cheers Oupa-G
- Attachments
-
- Note counterweights on crank
- Engine Balance1.jpg (59.5 KiB) Viewed 4095 times
-
- Showing on single big counterweight
- Engine Balance2.jpg (43.58 KiB) Viewed 4095 times
-
- Note the balancing of the flex plate that in itself is again a counterweight and assimetric
- Engine Balance3.jpg (61.16 KiB) Viewed 4095 times
-
- The flexplate from the clutch side BMW then mounts the clutch plate on there to form the flywheel. Engines do well with flywheels. All engines have flywheels for good reasons they make the powerpulses smooth at all revs. More so lower down in the rev range.
- Engine Balance4.jpg (44.67 KiB) Viewed 4095 times
Re: Building the new Bushbaby SAFARI
Just a short report the exhaust for the Explorer was changed to fit the engine installation. A new jig was made and the pipes changed. Some late nights and there she is .Vliegvark helped with the in house welding. He is welding like a pro just some pics to wet the apatite. He is now ready to become a coded welder.
The night is calling
Cheers Oupa-G
Ps I had a problem with my foto shrinking software have re-installed it and so here are the Photies
Cheers Oupa-G
The night is calling
Cheers Oupa-G
Ps I had a problem with my foto shrinking software have re-installed it and so here are the Photies
Cheers Oupa-G
- Attachments
-
- Vliegvark at it welding like a pro
- welding.jpg (54.85 KiB) Viewed 3887 times
-
- Some detail
- welding1.jpg (43.9 KiB) Viewed 3887 times
-
- More detail
- welding2.jpg (32.23 KiB) Viewed 3887 times
-
- Final product I hope it fits it has departed toe Loeries will hear the result of the fit to-morrow
- welding3.jpg (35.13 KiB) Viewed 3887 times
Re: Building the new Bushbaby SAFARI
Today was an interesting day as the numbers were all the 1's. So today the Honda people delivered a new Honda Jazz for my wife at 11 min past 11 o'clock on this 11th day of the 11th year of this Century. She was very pleased . Then this afternoon I went to the RedX hangar and they were exchanging the PT6 of the Pilatus. We had a loaner engine while our engine was being overhauled. Tomorrow I am flying the post installation test flight because I have a test pilot rating. It is fine to fly an aircraft that is 15X heavier then the Bosvark's AUW and now costs 20 million Rand or more. But test flying the Bosvark is a no no. It is hard for me to get my head around that one. Enjoy the pics.
Cheers Oupa-G
Cheers Oupa-G
- Attachments
-
- The madam is full of smiles
- Honda3.jpg (63.5 KiB) Viewed 3869 times
-
- The paperwork to prove the date and ti
- Honda4.jpg (33.05 KiB) Viewed 3869 times
-
- Overhauled engine in its "home"
- PC12-1.jpg (45.93 KiB) Viewed 3869 times
-
- Loaner engine on its cradle back to the factory
- PC12-3.jpg (31.11 KiB) Viewed 3869 times

Re: Building the new Bushbaby SAFARI
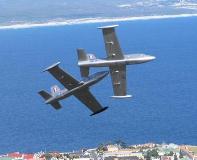
Hi Oupa. Saw you circling the PC12 over Bellville on Saturday Morning. Wow what a lovely sight to see that graceful plane circling tightly at low level. Thanks for the show 
Re: Building the new Bushbaby SAFARI
Hi Oupa
I was fortunate enough to see you execute two absolute perfect T&G's @ FAFK on Saturday morning. What a privilege to see and hear such a beautiful plane while standing so close to the runway.
Lourens
I was fortunate enough to see you execute two absolute perfect T&G's @ FAFK on Saturday morning. What a privilege to see and hear such a beautiful plane while standing so close to the runway.
Lourens
Who is online
Users browsing this forum: No registered users and 45 guests