Page 5 of 6
Re: Scratch build a Trike
Posted: Wed Mar 09, 2011 6:54 pm
by freetoadventure
looking good Otto, cant wait to see it ....
Re: Scratch build a Trike
Posted: Wed Mar 09, 2011 9:49 pm
by Jabbanaught
Any update?
Re: Scratch build a Trike
Posted: Tue Mar 15, 2011 8:35 pm
by ystervark7
As usual, I do not get to spend so much time on the trike as I would like.
I am also preparing for our trip to Namibia with th trikes which uses up the little time that I do have.
What I did spend a lot of time on recently is doing analysis of the pylon. The original design of the pylon required a lot of strengthening plates if I wanted to make it strong enough. I have therefore sit down and basically started from scratch with the pylon.
The old design made use of square tubing, the new design is constructed from 2mm plate and flat bar. The results of the numerical analysis is shown below.
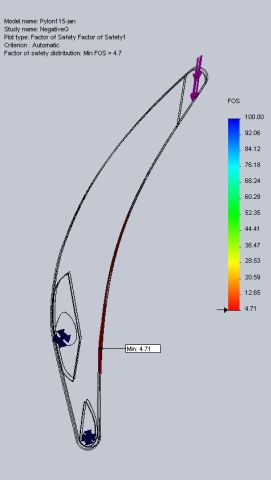
- Clipboard01.jpg (11.13 KiB) Viewed 7822 times
Above is shown the factor of safety of the pylon with a 4g load. The minimum factor of safety is about 4.7 in this model which is well within the limit of 1.5 required.
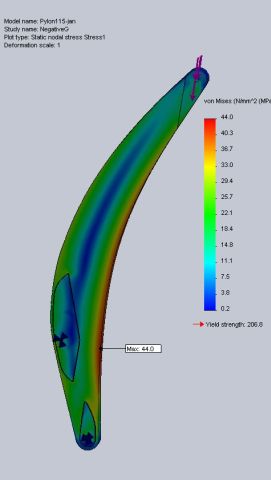
- Clipboard02.jpg (11.05 KiB) Viewed 7822 times
This is basic the same analysis but just a bit more colorful picture. It shows the Von Mises stresses in the pylon with red being the highest stress. It shows that the highest stress is about 44MPa (Stainless steel yield strength is about 205 MPa)
As soon as I have time I will also show the analysis of the fuel tank.
Re: Scratch build a Trike
Posted: Tue Jul 12, 2011 8:34 pm
by ystervark7
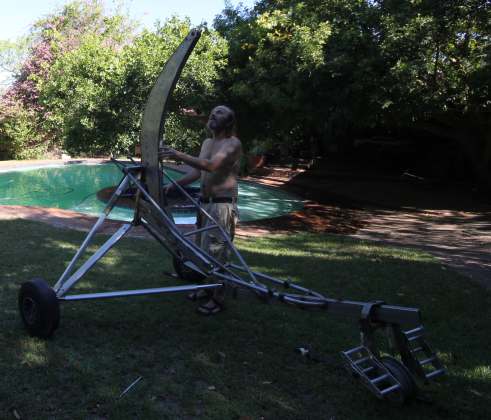
The pylon is now close to finished. The side plates were lasercut from 2mm stainless steel. The front and back is made from 50mmx5mm flat bar. I tried to bend the front and back myself but at the end I took it to a shop with a large roll bender. Stainless is a bit difficult to bend because it tends to spring back.
I helped Gerrie to tack it together and then he welded it. He had to do it bit by bit, about 70mm at a time, over cross to make sure that it does not wrap.
The middle mounting hole is still missing. This I will only drill once the frame is welded to ensure that it fits.
The pylon is quite heavy, about 16kg. To put this into perspective, compare it to the frame which is about 17-18 kg. I am still within my weight budget of about 210-220kg for the trike. That will leave a useful load of about 230kg for the PIC, PAX and fuel.
 Viewed 7622 times")
- Welded pylon
Re: Scratch build a Trike
Posted: Tue Jul 12, 2011 11:10 pm
by Oupa-G
I have seen this work of art it is not only beautiful but also well engineered. I wonder how many trikes are flying where every part has been subjected to a full analytical stress analysis. Ystervark you are doing a grand job.
Cheers Oupa-G
Re: Scratch build a Trike
Posted: Sat Jul 23, 2011 9:36 am
by AndyCAP
Wow your analisys pictures really make me reminisce of my study times at US. Its really awesome to see such design work. There are always better engineering solutions for a problem and its very gratifying to see pure engineering principles being applied. Makes me want to go back to university to learn and play

. Keep up the good work. Just hope the CAA can understand what you are doing....
Re: Scratch build a Trike
Posted: Thu Oct 06, 2011 7:07 pm
by ystervark7
Re: Scratch build a Trike
Posted: Wed Oct 12, 2011 8:35 pm
by Oupa-G
Just back from a trip to Namibia and while I was away the new engine mount materialized. The photo's do not do justice to the beauty of the engineering involved also the full stress analyses I think Ystervark should show us some pictures of the forces in the engine mount. If you compare the welding of this engine mount to say amount of a Cessna 150 you can see that sometimes NTCA can do better. Some of the aircraft that are certified have the paperwork but not always the quality. I'm proud this type of work is coming out of a home workshop with the help of our welder Gerrie.
Cheers Oupa-G
Re: Scratch build a Trike
Posted: Tue Jan 24, 2012 9:41 pm
by ystervark7
The Ystervark is is making some progress again. I had to make a lot brackets which Jan tacked for me. Last week it went to Gerrie for welding. Over the weekend I started assembling everything. I will have to take it apart again to electropolish the frame and anodize the aluminium.
 Viewed 6890 times")
- Fitting the pylon
 Viewed 6890 times")
- Looks OK
- All together
- IMG_1430.jpg (54.82 KiB) Viewed 6890 times
I borrowed some rims from OupaG (mine is not ready yet) . The front tyre and engine I will fit over the weekend. I will then do a quick weight and balance to determine the position of the final hole in the pylon.
The main outstanding items are the pod and the fuel tank which I will tackle in the next week or 2.
Re: Scratch build a Trike
Posted: Wed Jan 25, 2012 7:26 am
by nicow
I like it...

Re: Scratch build a Trike
Posted: Sun Jan 29, 2012 8:59 pm
by Oupa-G
This trike defines "nice and strong" based on solid engineering.
Cheers Oupa-G
Re: Scratch build a Trike
Posted: Fri Feb 03, 2012 12:40 pm
by Zim Zulu
amazing work!! watching this with respect and allot of interest! geez some dudes are gifted!!
Re: Scratch build a Trike
Posted: Fri Feb 03, 2012 5:54 pm
by Oupa-G
ZimZulu
The nice part is that this is not a kit, everything is from raw material every force going through the fabricated parts is properly stress analised. The harmonics of the fuel tank are such that they do not match the harmonics of the engine etc etc Ystervark is a meticulous engineer with real deep knowledge. Wonderful to watch and I'm proud that my workshop can host this "lekker" project.
Cheers Oupa-G
Re: Scratch build a Trike
Posted: Fri Feb 03, 2012 9:13 pm
by ystervark7
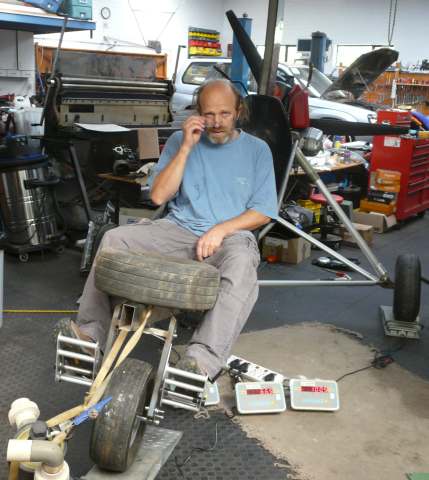
To make sure that the hang point is a the correct position before the final fitting of the pylon all components were fitted and equivalent weights were added for those components not available. The wheels and tires were not the final ones to be fitted since they are not ready. The fitted ones are about 2kg heaver than the final ones should be.
The wing was not fitted since that the CFG on a trike should be such that the back wheels touch before the front wheels while hanging from the wing. The fuel tank, fuel and PAX was also ignored during this test since they are very close to the CFG and should have very little influence on the CFG. This will be confirmed after final assembly.
The hang point was used as datum. A correct CFG should be at least behind the hangpoint. Surprisingly the calculated CFG was in front of the hangpoint! (about 20mm)
This did not correspond to my initial theoretical calculations that indicated that it should be about 40mm behind the hang point. All calculations were check again and an error was found in the spreadsheet where some of the engine weights were added twice. Stupid me.
This was corrected, which moved the hang point about 70mm forward. This corresponded within about 10mm of the measured CFG.
The hang point needs to be moved 70 mm forward. Fortunately the pylon holes must still be drilled and can be moved moved (that is why I have done this now because after this I will need to build a new pylon if I want to move the holes and believe me, I do not want to do that.)
The total weight is, not surprisingly, more than what I anticipated. The current weight is about 170kg but that is without the fuel tank and wing. The fuel tank is about 5 kg and the wing is 50 to 60kg. That gives me between 225 an 230 kg. Add 2 persons of 80kg+90kg gives me 400kg which leaves 50kg for fuel (that is 70liter). It should still be OK because it is unlikely that you will have a passenger with a full load of fuel.
- P1010381.jpg (59.86 KiB) Viewed 6706 times
Doing the weight and balance in oupa-G's workshop. You can see the tire in front of me which is the equivalent weight for the pod. There are also some oil containers on the engine for the radiator, air cleaner and fluids still missing.
Re: Scratch build a Trike
Posted: Mon Feb 06, 2012 11:11 am
by Grumpy
Ya ou Yster, krap maar daai kop. Looking Good