
Got stuck in over the last week attaching the side skin to the main spar attach carry through and starting putting in the curvature of the front side skin where it attaches to the firewall. The curvature has been reinforced by straight L angles and some crimped L angles. After clecoing the side skin to the firewall on one side the angle of the firewall is finally set at the require 77 degrees (previously it was only clamped in place and every time I knocked into the aircraft I would have to reset the entire balancing act).
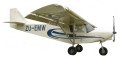
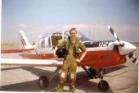
Anyway I have attached some pictures to give you some idea of the level of progress.
Cheers for now.