So…..what did we learn from this experience? What would we have done differently after being through the entire process. I certainly don’t have all the answers, but I can tell you I learnt a hell of a lot about trikes in the last 4 months. This is not intended to be a manual or a guide…rather it is what I took out of the experience….use it, lose it, but someone may find it of use?
The Road to rebuilding an Aquilla.
1: Reflection: An accident is never a nice thing to go through. First there are the consequences to the pilot that need to be dealt with. With a great deal of luck, the injuries sustained during this one were minor…. Boiled down to a broken finger at the end of the day, the psychological damage however takes longer to heal…and the emotional anxiety in the days following an accident may make you take a spontaneous decision you may regret. Staring at a broken heap of what was once your beloved plane is pretty soul destroying, I strongly recommend taking some time out to reflect on everything related to the incident with special attention to the actual cause. You need to get your head clear of the accident in order to move on towards the next goal.
2: Damage Assesment: This guys…. is probably the most important aspect as it affects everything from this point onwards. A systematic and carefull stripdown of all damaged sections needs to be performed. Hans now calls me “mr plastic”…
One has to remember that there are incredible forces that dissipate through the entire airframe during a prang. The energy has to be absorbed somewhere and although something may look straight…you have to examine everything you plane to re use very carefully….if you even suspect it’s damaged…replace.
It is this prep work that lays the foundation for everything to follow. We only placed 1 order from solowings…did not have to order anything extra because of the time we spent making sure of what we had to order, and thus we stuck to our budget and did not have any time spent waiting for parts halfway through the actual build. You will not regret investing as much time as is needed to do this, and it only costs you time.
3: Getting the Costing Done:
I divided the project into 3 sections
A) The Wing
B) The Undercarriage
C) The Engine and Prop.
Taking the list of usable components just completed, with the AP in charge, you now individually cost each section of the re build with the labour charge. Send the wing as is down to the manufacturer and get a complete quote. (Even though you have not made a decision yet, it is worth the R450 in courier fees to get this done.) Remember to factor in return delivery/courier fees etc etc. Don’t let the AP say “About this much”….get proper pricing for each section you are going to do. Once this is tallied up, you will have the total cost. Once you have recovered from the shock, you will be in a position to decide whether or not you will be able to proceed.
At the end of the day, forget “Bernoulli’s principle”….MONEY=LIFT. End of story.
You now have to make an informed and realistic decision. Depending on the cost that you’ve just calculated…it may not make financial sense to re build? For us, it was borderline…. Our budget was a max R90k. A 600hr 2nd hand trike at today’s prices was in the region of R70K…. At the end of the day, we bit the bullet and went for it. It was our engine that swung our vote. 390hrs and it did not take a knock at all. For an extra R20k we were going to have a brand new aerie with a 400hr motor.
Believe it or not….you are now 50% of the way through your trike rebuild. Your groundwork is done.... Your wing is already at the manufacturer awaiting a go ahead, your parts order is a payment away from delivery. Your AP is ready and waiting. Get cracking…pay the suppliers and await delivery. We were lucky, and they had stock of everything!
Get the parts that need spraying off to the powder coaters during this time so you don’t wait later on.... Fit your instruments so long etc etc.
In a few short weeks, you are in possession of strange long heavy packages containing various items all neatly wrapped and you have now accumulated a mountain of bubble wrap (free of charge).
Naturally the undercarriage is first to get assembled. The most difficult part of this is getting the seat frame aligned along the boom. If you don’t get this position exactly right, it changes the angle of the propeller to the airflow in flight. A mistake here will result in a major strip down later on to correct. MAKE SURE! We spent the best part of a day getting this right, far more time on this than anything else.
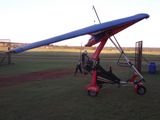
Within a day, the “rolling airframe” is complete. The Engine takes an hour or two to mount and complete the cable installations etc ,etc. Where after your prop can be fitted. A few short runs up and down the runway in your Rotax powered “Go kart” add to the fun.
It’s actually quite frightening how unstable the cart feels without a wing… be careful!
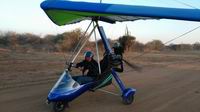
The wing assembly (done by the manufacturer and test flown by them beforehand) is a non event really. Take it out the bag, spread it, install batton’s, tension it and bolt it to the pylon. Tie the wing up against the profile tube…stand back and try and contain your excitement! You are a few inspections away from your first flight! Ground testing, some fine tuning here and there, test all instrumentation and the job is done.
CAA inspectors can take up to 3 weeks to come and “check everything”. We waited too long to book an inspection. When you are a week away from finishing…book the guy. You can always postpone if there is a problem but it’s frustrating having a perfectly flyable plane and you are waiting for an ATF….
Rebuilding your plane is a hell of a challenge but not the nightmare you think it should be. The most important part of it is in the planning and budgeting. You can assemble a trike in less than 3 days....fact.
It’s the logistics and making sure all the correct items are on site that make the difference. Here is where a lot of guys have gone wrong….something not budgeted for or overlooked beforehand can be catastrophic and leave you with a half built plane and no money left to complete. Your AP is vital in this process….choose someone you trust and make sure they check everything you plan to re use before you start anything.
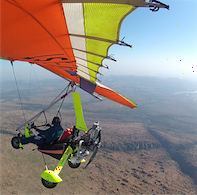
It takes time yes…but I cant describe the pride and fulfilment you get when you push that bar and head off into the big blue in a machine you have put you own blood, sweat and tears into…. I hope this rather long read will inspire others to not immediately give up on that crumpled head of aluminium that fills your mind after a mishap…where there’s a will, there’s a way, and you may just end up with a plane that you enjoy even more than you did before.
Here’s to blue skies chap’s….. Bundy’s back.